Step-by-Step Installation Guide for Underfloor Heating
Underfloor heating is an elegant and efficient way to warm your home, providing evenly distributed heat and freeing up wall space from radiators. Whether you're renovating or building from scratch, installing underfloor heating can be a manageable DIY project or a professional task, depending on your comfort level. Here's a comprehensive guide to help you through the installation process.
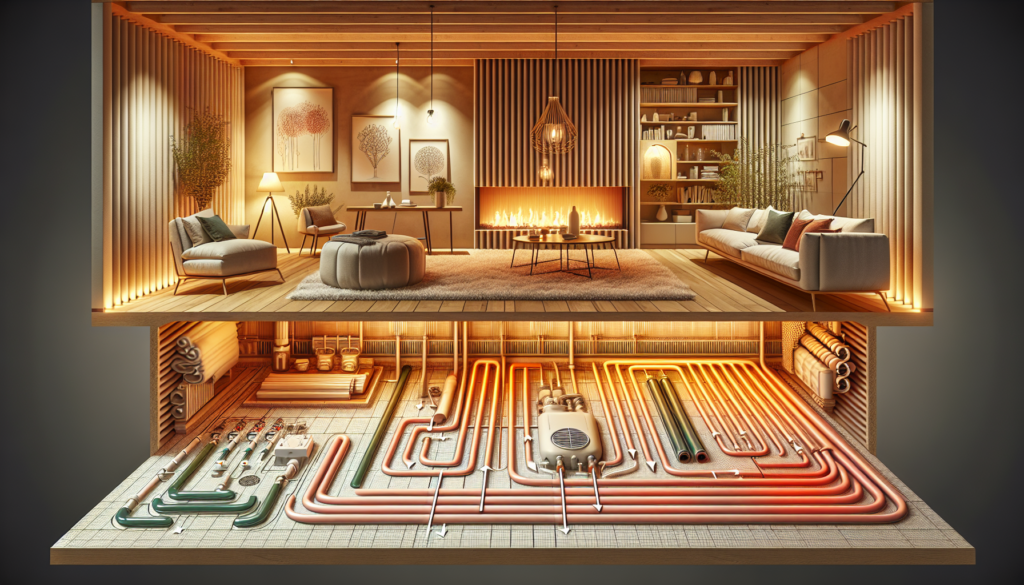
Assessing Your Space
Before you jump into the installation, it's crucial to assess your space and decide which type of underfloor heating system suits your needs. Generally, there are two main types:
-
Electric systems (or dry systems): Ideal for smaller areas or as part of a renovation, easy to install under tile and wood floors.
-
Hydronic systems (or wet systems): Utilizes a network of water pipes connected to a boiler, best for larger areas or new builds for maximum efficiency.
Considerations:
- Type of flooring
- Available energy sources
- Desired control options (e.g., thermostats)
- Budget constraints
Gathering Your Tools and Materials
The first step in the installation process is ensuring you have all the necessary tools and materials:
- Underfloor heating kit (electric mats or hydronic pipes)
- Insulation boards or foil
- Thermostat
- Multimeter (for electric systems)
- Pipe cutter (for hydronic systems)
- Adhesive/primer (for the flooring type)
- Safety equipment (gloves, goggles)
Preparing the Subfloor
The foundation for your underfloor heating system is the subfloor, which must be adequately prepared:
- Clean the Area: Ensure the subfloor is clean, dry, and free of any debris or sharp objects.
- Check the Level: Use a spirit level to ensure the subfloor is even. Uneven floors may need a self-leveling compound.
- Install Insulation: Insulation boards or foil will prevent heat loss downward, maximizing the efficiency of the heating system.
Installing the Underfloor Heating System
For Electric Systems
- Lay Out Heating Mats: Roll out the heating mats according to the manufacturer's layout plan, cutting the mesh (not the cable) where necessary to fit around corners.
- Fix the Mats in Place: Use adhesive tape or a primer to secure the mats to the subfloor.
- Install the Floor Sensor: Install the temperature sensor provided in the kit between the heating wires.
For Hydronic Systems
- Layout Pipe Configuration: Use the provided layout plan, installing pipes in a consistent pattern (like a spiral or serpent shape) to ensure even heat distribution.
- Fix Pipes: Secure pipes using clips or rail systems provided with the kit.
- Connect to Manifold: Ensure that each circuit is securely connected to the manifold, crucial for balancing the system.
Wiring and Plumbing
For Electric Systems:
- Connect the heating elements to a power supply as per the instructions, ensuring to follow electrical safety standards.
- Connect the thermostat and ensure it functions correctly by testing with a multimeter.
For Hydronic Systems:
- Connect the manifold to an existing boiler or a dedicated one for the underfloor heating.
- Ensure all connections are tight and there are no leaks.
Testing the System
Before laying the final flooring:
- For Electric Systems: Use a multimeter to test the continuity of wires and ensure there are no breaks.
- For Hydronic Systems: Pressure test the system to check for any leaks in the pipework.
Laying the Floor Covering
After testing the system, you can proceed to lay your chosen floor covering, whether it's tiles, laminate, hardwood, or carpet. Consult with your flooring provider to ensure the materials are compatible with underfloor heating.
Final Check and Configuration
Configure your thermostat settings based on your comfort preferences and energy efficiency goals. Monitor the system's performance initially to ensure even heating.
Conclusion
Installing underfloor heating can be a rewarding project, offering comfort and efficiency for years to come. Whether tackling it yourself or hiring a professional, understanding the process ensures that you achieve the best result. Enjoy the cozy warmth of your newly upgraded space!